
You might know that video is important, that your audience wants to see it, and you might even want to make it a part of your strategy. But you’re still asking the big question:
“How?”
If you aren’t producing video content because you don’t think you have the ability, time, or resources to do it, we have some good news: Your answer to the video content question could be sitting in your pants pocket. (Hint: It’s your iPhone.)
You or a member of your team most likely already owns a great video camera — one that’s easier to use than a traditional, high-tech setup. In this post, we’ll walk you through our tips and best practices for filming high-quality marketing and social media videos with your handy iPhone and a just a few other tools. And if you don’t have time to read them all, we’ve demonstrated how to do it in the video below.
P.S. We filmed it with an iPhone.


How to Shoot Videos with an iPhone
1) Find a quiet place to film.
This might seem obvious, but if you’re filming at work or out in public, the sight of a phone might not tip people off to keep the volume down if they’re nearby. If possible, book a conference space, hang signs telling people to steer clear of where you’re shooting, or bring a coworker with you to block off the area where you plan to film.
2) Make sure your iPhone has enough storage space.
Have you ever experienced the dreaded moment when you were unable to capture a video because you got this pop-up notification?
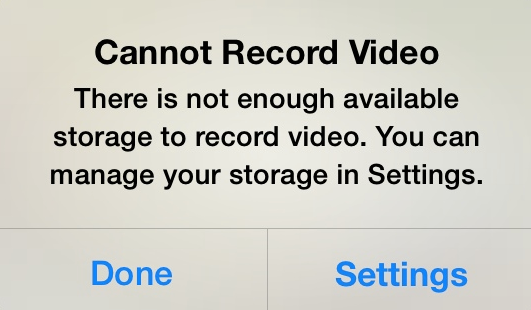
If this notification pops up while you’re filming a video, your phone will stop recording, and you’ll have to start over. To prevent this, make sure you have enough space before pressing “record.” Delete as many unnecessary files and apps as you can, and if needed, purchase iCloud storage for files to free up more space on your device itself.
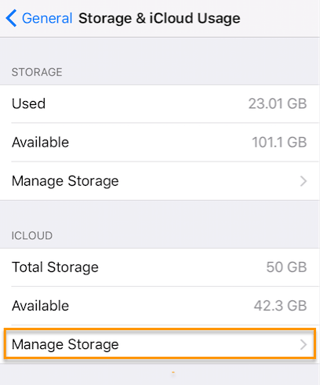
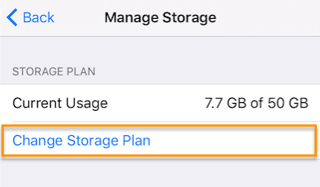
To do this, navigate to “Settings,” select “General,” “Storage & iCloud Usage,” and tap “Manage Storage” to buy more space for as little as $0.99 per month.
3) Turn off notifications.
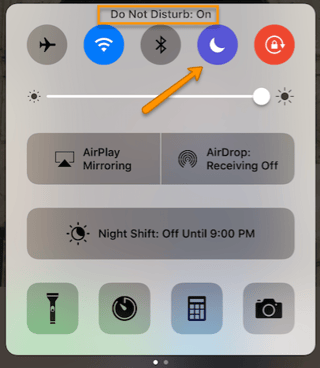
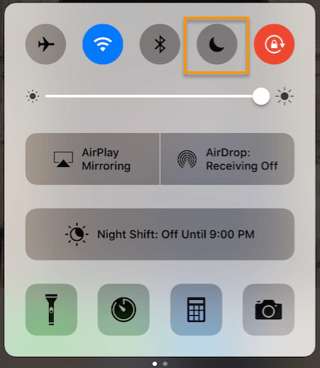
Another distracting iPhone feature that could interrupt your filming is how frequently your device receives notifications. Before you start filming, set your iPhone to Do Not Disturb mode to keep notifications going in the background so you can film uninterrupted.
Swipe up on your phone and tap the crescent moon icon to put your phone in Do Not Disturb mode, and tap it again when you’re done to return your phone to normal settings.
Pro tip: Do Not Disturb is a great way to watch YouTube videos, play games, and sleep uninterrupted, too.
4) Use a tripod.
I don’t care how steady you think your hands are — they probably aren’t steady enough to film a video.
Now, it’s one thing if you’re scrappily putting together a Snapchat Story, but if you’re filming a video for your brand — especially one that will live permanently on your blog, YouTube channel, or other social media assets — you’ll need the help of a tripod to keep the video steady and clear.
You can purchase full tripods, or smaller versions for your desk on Amazon, at Best Buy, or other vendors.
5) Light your video.
This point is especially important if you’re filming in an office building with lots of overhead lighting. You don’t need to buy anything fancy for this step — in fact, our friends at Wistia put together this guide to a DIY lighting setup. You need enough light to give the impression of natural light, which means it’s coming from a variety of different light sources, and not just directly overhead.
If you don’t have the time or budget to purchase a lighting setup, find a room or location with plenty of natural light — and remember to turn off the overhead lights — to keep your video subject looking good.
6) Use a microphone.
Make sure you use some sort of microphone to minimize the impact of distracting ambient noise. The expression “the silence is deafening” is real — especially when it comes to video production.
You don’t need a fancy microphone and boom setup like in the movies, although those would be a great investment to make if you plan to film a lot of videos. You can use something as simple as a microphone that plugs into your iPhone’s headphone input to get great audio for your videos — and you can buy one here.
7) Film horizontally.
When people view videos on mobile devices, the video automatically rotates according to the orientation of the device it’s being viewed on. So, it makes more sense to film horizontally so your video can be viewed if the user rotates his or her phone, or is watching on a large tablet or computer screen. If you film vertically and the viewer’s screen is rotated, the video will appear more constricted.
There are exceptions to this, of course — if you’re filming a video specifically for Snapchat or Instagram, for example, you should film your video vertically on your iPhone, because that’s how the videos will be consumed. But if you’re filming for Facebook, YouTube, or another video hosting site, film horizontally to help viewers get the best possible viewing experience, no matter what device they press play on.
8) Don’t use the iPhone’s zoom capability.
Simply put, iPhone’s zoom will most likely make your video look bad.
We’ll elaborate: Unless you have the ultra-fancy iPhone 7 Plus camera, zooming in on an iPhone will simply enlarge the image — it won’t get you closer to what you’re filming — so it’ll make your final video pixellated and blurry-looking.
Instead, physically move your filming setup closer to your subject to eliminate the need to zoom in.
9) Lock your exposure.
The iPhone does a fantastic job of finding the subject to focus your camera’s exposure — which is great for taking a photo. But when it comes to filming a video, its super-powered exposure will continue adjusting and readjusting according to movement — leaving your final video occasionally blurry and out of focus.
You can solve this problem by locking the exposure while you’re filming. Before you press record, hold down your finger on the subject of your video until a yellow box appears around the person or object and the words “AE/AF Lock” appear:

10) Edit on a computer.
Once you’ve filmed your video, you need to edit it and get it ready for publication. And although the iPhone offers a lot of visual editing tools within its interface, it’s best to use editing software on your computer to fine-tune the images. Software like iMovie and Adobe Premiere Pro let you add sound, captions, and adjust filtering to make your video look (and sound) as professional as possible.
Lights, Camera, Action
You don’t need a ton of expensive equipment to film and edit engaging videos — you just need to follow the steps above to film something that looks professional with the help of your handy iPhone. If you don’t have an iPhone, never fear — we’ll create some guidance for Android devices soon. In the meantime, download our guides to creating videos for social media to get started distributing your content today.
What are your tips for filming videos on the iPhone? Share with us in the comments below.
![]()
Powered by WPeMatico


